
Dual Axis Sun Tracker Solar Panel Without Arduino
Introduction
In the fast developing sector of renewable energy, the use of solar power has attracted substantial attention. Solar panels are increasingly being utilized to capture sunlight and convert it into electricity, but in order to function as effectively as achievable, they must face directly toward the sun. Here’s where solar trackers are useful. We will walk you through building a Dual Axis Solar Tracker in this project, which will make sure your solar panel is always facing the sun. Discover the newest project from MArobotics Blogs: a Dual Axis Sun Tracker for Solar Panels without Arduino. By dynamically positioning the panel with the sun in both the horizontal and vertical axes, this invention maximizes solar energy capture and demonstrates an effective, Arduino-free method of renewable energy solutions. Best feature? We’re streamlining the process by completing this without an Arduino.
Components Required
- PVC Card board 3mm
- PVC Card board 5mm
- Solderless Breadboard
- LM 358 IC x 2
- 555 Timer IC
- LDR Sensor x 4
- L293D Motor Driver
- 10k Resistor x 4
- 1k Resistor x 5
- Blue LED x 4
- 104pf Capacitor
- 103pf Capacitor
- 10k Variable Resistor
- 100k Variable Resistor
- 4148 Diode x 2
- MG996 Servo motor
- Female Header
- 5V LED Light
- 5V DC Fan
- 5V 6W Solar Panel
- DC to DC boost converter LM2587
- LiPo Battery Charger Module Mini TP4056 IC
- On/Off Switch x 3
- 18650 Battery Holder – 1 Cell
- 18650 Battery Cell 3.7V
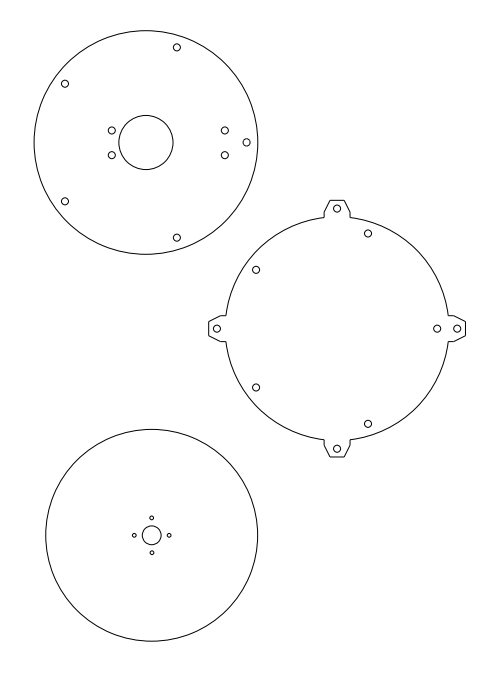
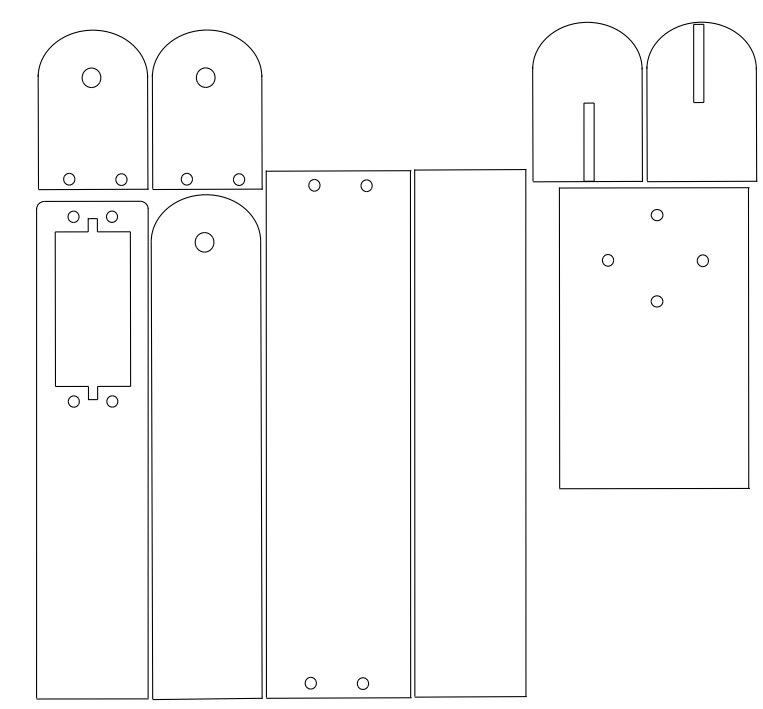
Cutting Designs
Following are the cutting designs. Print them on separate A4 papers. You can use 5mm acrylic sheet or 5mm foam board sheet and cut these designs on it.
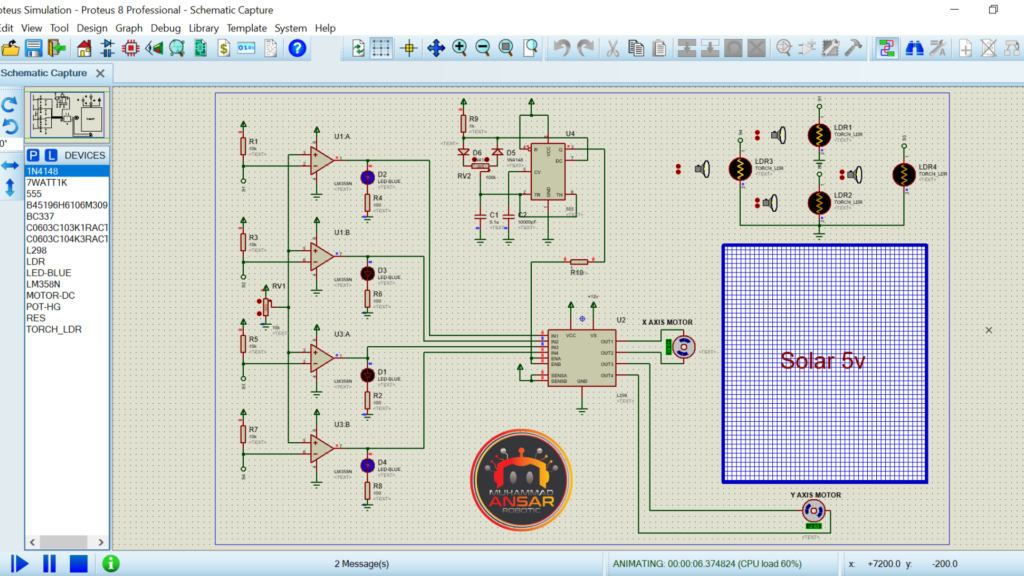
Proteus Simulation
Open simulation file on proteus 8. In simulation, first of all, a 5 volts solar panel is used. In order to move solar panel according to the sun’s direction. four LDR sensors are used. LDR is light dependent resistor. It means that with the variation in the amount of light, the value of the resistance varies. With each LDR sensor, we have attached a low pass filter. For low pass filter, LM358 IC is used. It has two low pass filters. We haveused one for x angle and second for y angle. We have used LEDs at the output for indication. The output of low pass filters is provided to L298 motor driver. At out1 and out2 of L298 motor, the motor for x angle is attached. At out3 and out4 of L298 motor, the motor for y angle is attached. We have generated PWM pulse using 555 timer which is provided at enableA and enableB pins of the L298 motor driver. This is for controlling the speeds of the DC motors. After running the simulation, if amount of light is same for all four LDR sensors then both motors are stop. Solar panel will move in the direction of that LDR sensor on which the amount of light is more.
Circuit Diagram
A well-designed circuit is necessary for a solar tracker to work well. We’ll include a thorough circuit schematic that shows the connections between the parts. Having a clear roadmap for connecting everything up is essential for a successful assembly and execution, which is why this visual depiction is so important.
In the circuit diagram, a solar panel is used. A Lipo battery charger module TP4056 is used. Two cells of 3.7 volts are used in parallel. To turn the power on or off, a switch is used. A DC to DC boost converter with 3.7 volts at its input is used. Using its potentiometer, we have set 5 volts at its output. There 5 volts are used for the circuit. An emergency light is used and a switch is connected to turn it on or off. A 5 volts fan is used and a switch is connected with it. Two LDR sensors are used for x-axis angle and two LDR sensors are used for y-axis angle. Using LM358 ICs, there output is provided to the motor driver. To set the sensitivity for four LDR sensors, a potentiometer is used. To generate PWM pulse, 555 timer is used. Here, a potentiometer is attached to control the speed of the DC motors. Pin 3 of 555IC is connected to enA and enB pins of the motor driver. Two MG996 servo motors are used. The motor for x-axis angle is connected to Out1 and Out2 of the motor driver. The motor for y-axis angle is connected to Out3 and Out4 of the motor driver. We have changed the servo motor to DC gear motor.
Hardware Testing
Conclusion
Our ability to construct a Dual Axis Solar Tracker without the intricacy of an Arduino has enabled us to provide a practical and affordable way to maximize the efficiency of your solar panel. Through the process of completing this assignment, you have acquired important knowledge about solar tracking technology. A Dual Axis Solar Tracker has many advantages, the most important of which are enhanced energy output and sustainability. It is not only economically feasible but also environmentally beneficial to fully utilize solar electricity.
We hope that our effort has encouraged you to do more research in addition to giving you a useful method to optimize your use of solar energy. This design may be enhanced and expanded upon in a myriad of ways. Gaining knowledge and expertise here may be a great starting point for any project, whether it larger solar arrays or the integration of sophisticated control systems.
5 responses to “Dual Axis Sun Tracker Solar Panel Without Arduino”

Electric vehicle solar charging with solar traker..
Bonjour Monsieur.
J’aime beaucoup ce travail.Svp vous avez fait le design dans quelle application ? Solidworks ?
Assalamu Aleikum
Would you kindly attach addresses to sources of parts needed to do the project, and possibly id there are people who sell the circuits ready to use ,
Thank youWhat is the cost of all products used in this project
What is the cost of all products used in this project
And where can I get these items


5 thoughts on “Dual Axis Sun Tracker Solar Panel Without Arduino”
 Rajesh says:
Electric vehicle solar charging with solar traker..
- DJUFFO says:
Bonjour Monsieur.
J’aime beaucoup ce travail.Svp vous avez fait le design dans quelle application ? Solidworks ?
- Farouk Alhinnawi says:
Assalamu Aleikum
Would you kindly attach addresses to sources of parts needed to do the project, and possibly id there are people who sell the circuits ready to use ,
Thank you What is the cost of all products used in this project
And where can I get these items
Leave a Reply