
Obstacle Avoiding Robot Using Arduino UNO And L293D With HC-SR04 Sensor

Introduction
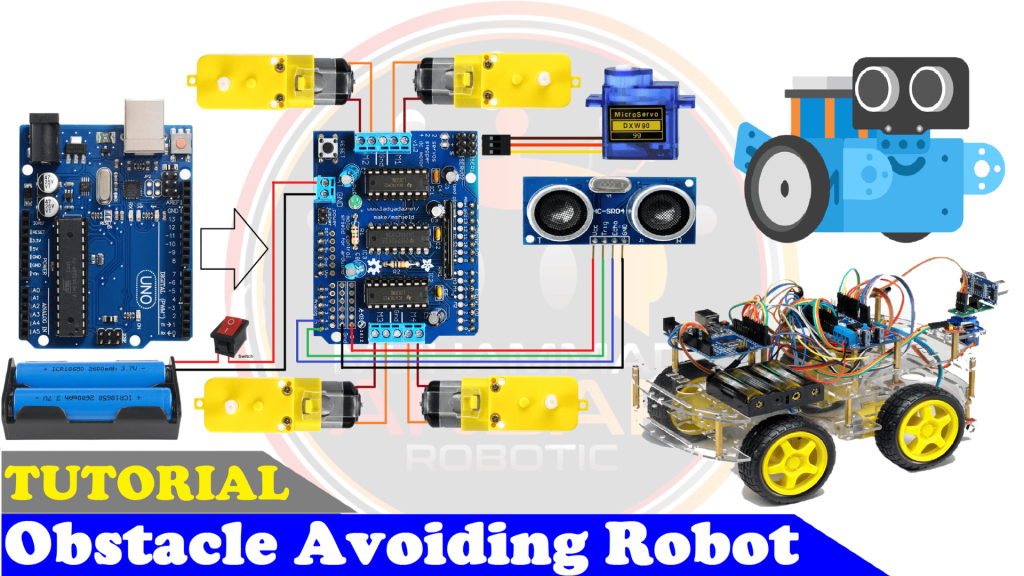
Using an Arduino Uno, an L293D motor control shield, and an HC-SR04 ultrasonic sensor to create an obstacle-avoiding robot is a fascinating project that combines programming and hardware. This robot can move on its own by identifying obstacles in its route and evading them to prevent collisions. Using a mix of motors and sensors, the Arduino platform is used in this project to demonstrate the flexibility and power of do-it-yourself robotics.
Components Required
- Arduino UNO
- 4-wheel Robot Car Kit
- L293D Motor Driver
- SG90 Servo Motor
- Ultrasonic Sensor Holder
- Ultrasonic Sensor HC-SR04
- Female to Female Jumper Wires
- 18650 Battery Holder – 2 Cell
- 18650 Battery Cell 3.7V x 2
Circuit Diagram
The L293D Motor Driver is connected to the power supply, which is two 18650 battery cells with a combined voltage of 7.4V. This power source powers the four DC motors that drive the wheels. The SG90 Servo Motor is linked to pin 10 on the Arduino, and the Ultrasonic Sensor is attached to the Arduino UNO via the trigpin and echopin. Jumper wires that link female to female are used to make connections between the different parts. The Arduino UNO controls the entire logic, which includes measurements of distance from the Ultrasonic Sensor and servo motor movements for avoiding obstacles. The L293D Motor Driver controls the motors’ direction and speed.
Arduino IDE Code
#include "AFMotor.h"
#include <Servo.h>

#define echopin A4 // echo pin
#define trigpin A5 // Trigger pin

Servo myservo;

const int MOTOR_1 = 1;
const int MOTOR_2 = 2;
const int MOTOR_3 = 3;
const int MOTOR_4 = 4;

AF_DCMotor motor1(MOTOR_1, MOTOR12_64KHZ); // create motor object, 64KHz pwm
AF_DCMotor motor2(MOTOR_2, MOTOR12_64KHZ); // create motor object, 64KHz pwm
AF_DCMotor motor3(MOTOR_3, MOTOR12_64KHZ); // create motor object, 64KHz pwm
AF_DCMotor motor4(MOTOR_4, MOTOR12_64KHZ); // create motor object, 64KHz pwm
//===============================================================================
//  Initialization
//===============================================================================

int distance_L, distance_F, distance_R;
long distance;

int set = 20;

void setup() {
  Serial.begin(9600);           // Initialize serial port
  Serial.println("Start");

  myservo.attach(10);
  myservo.write(90);

  pinMode (trigpin, OUTPUT);
  pinMode (echopin, INPUT );

  motor1.setSpeed(180);          // set the motor speed to 0-255
  motor2.setSpeed(180);
  motor3.setSpeed(180);
  motor4.setSpeed(180);
}
//===============================================================================
//  Main
//===============================================================================
void loop() {
 distance_F = data();
 Serial.print("S=");
 Serial.println(distance_F);
  if (distance_F > set){
   Serial.println("Forward");
  motor1.run(FORWARD);         // turn it on going forward
  motor2.run(FORWARD);
  motor3.run(FORWARD);
  motor4.run(FORWARD);
    }
    else{hc_sr4();}
}


long data(){
  digitalWrite(trigpin, LOW);
  delayMicroseconds(2);
  digitalWrite(trigpin, HIGH);
  delayMicroseconds(10);
  distance = pulseIn (echopin, HIGH);
  return distance / 29 / 2;
}


void compareDistance(){
  if (distance_L > distance_R){
  motor1.run(BACKWARD);   // turn it on going left
  motor2.run(BACKWARD);
  motor3.run(FORWARD);
  motor4.run(FORWARD);
    delay(350);
  }
  else if (distance_R > distance_L){
  motor1.run(FORWARD);  // the other right
  motor2.run(FORWARD);
  motor3.run(BACKWARD);
  motor4.run(BACKWARD);
    delay(350);
  }
  else{
  motor1.run(BACKWARD);  // the other way
  motor2.run(BACKWARD);
  motor3.run(BACKWARD);
  motor4.run(BACKWARD);
   delay(300);
  motor1.run(BACKWARD);   // turn it on going left
  motor2.run(BACKWARD);
  motor3.run(FORWARD);
  motor4.run(FORWARD);
    delay(500);
  }
}

void hc_sr4(){
    Serial.println("Stop");
    motor1.run(RELEASE);         // stopped
    motor2.run(RELEASE);
    motor3.run(RELEASE);
    motor4.run(RELEASE);

    myservo.write(0);
    delay(300);
    distance_R = data();
    delay(100);
    myservo.write(170);
    delay(500);
    distance_L = data();
    delay(100);
    myservo.write(90);
    delay(300);
    compareDistance();
}
Explanation
The required libraries, AFMotor for motor control and Servo for servo motor control, are first included in the code. The HC-SR04 ultrasonic sensor’s echo and trigger pins are then defined. Four DC motor objects and the Servo object are initialized. The motors are set up for a 64KHz PWM frequency and connected to certain motor pins. The setup() method, a specified threshold, and variables for distances are defined. The setup() method sets the initial speed of the DC motors, configures the trigger and echo pins, binds the servo to pin 10, and initiates serial communication. The data() method is used by the main loop to get the distance from the front. The robot advances if the distance exceeds the predetermined threshold; if not, obstacle detection and avoidance are handled by using the hc_sr4() function. The data() method sends a trigger signal to the HC-SR04 sensor, which measures distance by measuring the echo pulse’s duration. In order to avoid obstacles, the hc_sr4() function stops the motors, rotates a servo at various angles, and measures the distances on the left and right. The next step is to execute the compareDistance() method to find the best direction to avoid obstacles. This code essentially uses an ultrasonic sensor and DC motors to build a basic obstacle-avoidance robot. The robot advances until it detects an impediment, at which time it scans the area with the servo and selects a safe path to avoid it.
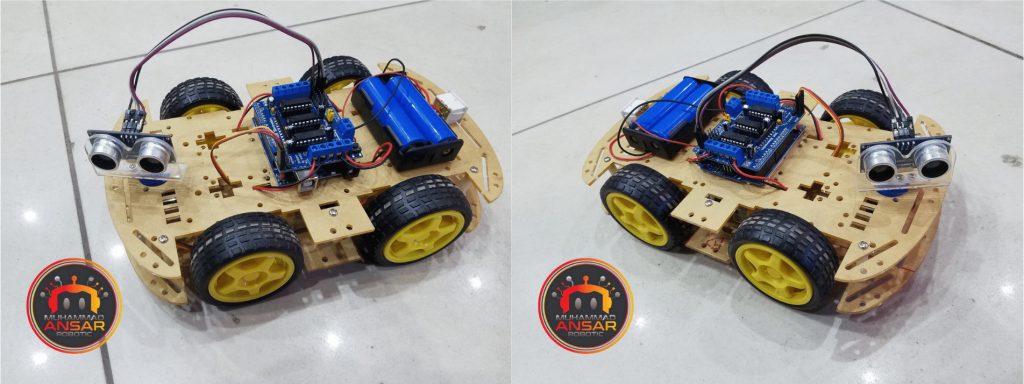
Hardware Testing
Attach every part in accordance with the circuit schematic. Using the Arduino IDE, upload the Arduino code to the Arduino Uno. The robot is powered by 18650 battery batteries. Watch how the robot responds to impediments along its route. Verify that the motors are reacting as intended and that the servo motor is scanning correctly.
Conclusion
To summarize, constructing an obstacle-avoiding robot with an Arduino Uno, an L293D motor control shield, and an HC-SR04 ultrasonic sensor is a fun and instructive project. It creates a robot that can navigate and avoid obstacles on its own by fusing hardware connections with programming logic. This project is a fantastic way to get started with robots and may be developed further to include more features and functionalities. Enjoy yourself as you experiment and learn about the world of robots!
5 responses to “Obstacle Avoiding Robot Using Arduino UNO And L293D With HC-SR04 Sensor”

tell me the place or shop in Lahore, where we can purchase their components.
hall road py shop hy “Electronic solutions”
Lahore Hall Road “Electronic solutions”
pure Pakistan mai nahi milega
In my opinion, you are mistaken.


Related Posts
Line Follower Obstacle Avoiding Robot Using Arduino And L298 Motor Driver
5 thoughts on “Obstacle Avoiding Robot Using Arduino UNO And L293D With HC-SR04 Sensor”
 Muhammad Abubakar says:
tell me the place or shop in Lahore, where we can purchase their components.
- sher hu india se says:
pure Pakistan mai nahi milega
Leave a Reply