
Smart Dustbin Using Arduino And Ultrasonic Sensor

Introduction
We’re even upgrading our trash management systems in this age of smart technologies. The “Smart Dustbin” project uses ultrasonic sensor technology and Arduino to completely change how we dispose of our rubbish. This project improves the effectiveness of garbage collection and management in addition to adding a little automation to a routine operation.
Components Required
- VPC Cardboard 3mm
- Arduino UNO
- SG90 Servo Motor
- Ultrasonic Sensor HC-SR04
- USB DC 1~5V to DC 5V Voltage Step-Up Boost Module
- LiPo Battery Charger Module Mini TP4056 IC
- On/Off Switch
- 18650 Battery Holder – 1 Cell
- 18650 Battery Cell 3.7V
- 9V Battery
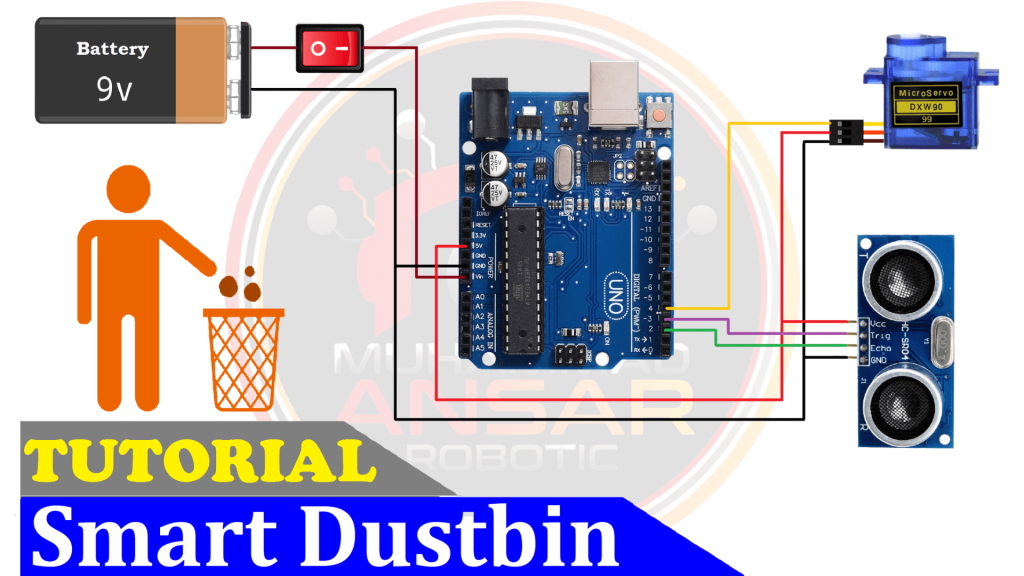
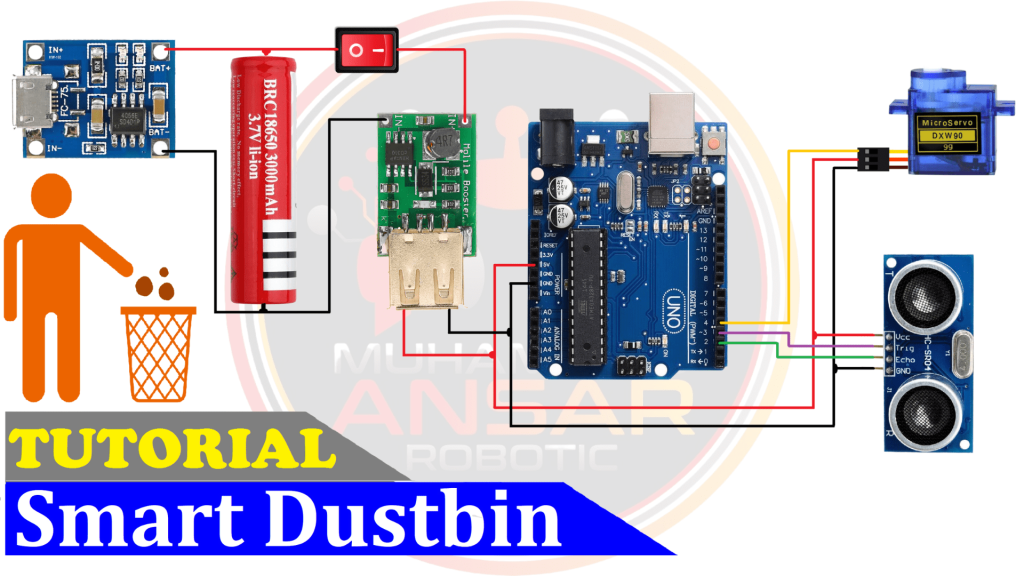
Circuit Diagram
Use this straightforward circuit design, which shows how each part connects to the Arduino Uno, to make your Smart Dustbin work. Verify your connections one more time before moving on with the project.
In the following circuit diagrams, an Arduino UNO is used as a microcontroller. A power on/off switch is connected. A servo motor is attached to open and close the lid of the dustbin. An ultrasonic sensor is used to detect automatically. The trigger pin of the sensor is connected to pin 3 of Arduino UNO. The echo pin of the sensor is connected to pin 2 of Arduino UNO. The servo motor is connected with pin 4 of Arduino UNO. 5 volts Vcc are provided to the servo motor and the sensor by Arduino UNO.
Using 9V Battery Power Source
Using 18650 Battery Cell 3.7V Power Source
Arduino IDE Code
#include <Servo.h> //includes the servo library
Servo myservo;

#define echopin 2 // echo pin
#define trigpin 3 // Trigger pin

int set_cm = 50;

long ultra_time;
long dis_cm;

void setup(){ // put your setup code here, to run once

Serial.begin(9600);// initialize serial communication at 9600 bits per second:

myservo.attach(4);
myservo.write(0);

pinMode (trigpin, OUTPUT); // declare ultrasonic sensor Trigger pin as Output
pinMode (echopin, INPUT);  // declare ultrasonic sensor Echo pin as input

delay(1000); // Waiting for a while
}

void loop(){
//*************************
ultra_read();
//*************************

Serial.print("Dis :");Serial.println(dis_cm);

if(dis_cm<set_cm){
myservo.write(20);
delay(50);
myservo.write(30);
delay(50);
myservo.write(40);
delay(50);
myservo.write(50);
delay(50);
myservo.write(80);
delay(50);
myservo.write(110);
delay(3000);
}

if(dis_cm>set_cm){myservo.write(0);}

delay(100);
}

//**********************ultra_read****************************
void ultra_read(){
digitalWrite(trigpin, LOW);
delayMicroseconds(2);
digitalWrite(trigpin, HIGH);
delayMicroseconds(10);
ultra_time = pulseIn (echopin, HIGH);
dis_cm =  ultra_time / 29 / 2;
}
Explanation
The servo motor is controlled via the Servo library. A member of the Servo class is myservo. The ultrasonic sensor’s echo and trigger pins are known as trigpin and echopin, respectively. The threshold distance in centimeters, set_cm, is set at 50. For debugging reasons, serial communication is initialized with serial.begin(9600). thisservo.attach(4) fastens pin 4 to the servo motor. The echo pin may be configured as an input and the trigger pin as an output using pinMode. To read the ultrasonic sensor and update the dis_cm value, the ultra_read function is used. For debugging purposes, the current distance is reported to the serial monitor. In the event that an item is identified within the predetermined range, the servo motor opens step by step. The servo motor closes if no item is within the predetermined distance. For stability, an extra 100 milliseconds of delay is introduced. This feature initiates the ultrasonic sensor and uses the pulse duration to determine the distance.
Hardware Testing
Now is the moment to test your invention. Turn on your Smart Dustbin and watch how it operates. The servo motor ought to swing open the lid as soon as an item gets close to the ultrasonic sensor, making simple garbage disposal possible. Verify that every component is operating as it should and resolve any problems that may have come up during testing.

Conclusion
To sum up, the Smart Dustbin project shows how basic parts like servo motors, Arduino, and ultrasonic sensors may be combined to invent novel solutions for problems encountered every day. In addition to improving a conventional dustbin’s performance, this do-it-yourself solution adds an automated feature that fits in with the rapidly expanding smart technology trend. By supporting initiatives like these, we help create a more intelligent and productive future. So go ahead and construct your own Smart Dustbin to yourself witness the ease of contemporary garbage management.


Leave a Reply